Ossetian Pies


I love Ossetian pies. Russia is a great country for pies, and Stolle has long been my favorite Russian restaurant. The wide counter has pies from one end to the other, and I always had a hard time deciding what to eat that day.

It was years later that I met Ossetian pies. My then-colleague Elena brought some to work one day, made by her mother, who is Ossetian. It was flat and round like a pancake, perhaps half an inch thick, and sandwiched a strangely delicious filling between thin layers of dough. The filling was slightly tangy and a bit meaty - it was hard to describe, but if I had to guess, I might have said it included bits of meat.

The pie in question (still my absolute favorite) was, in fact, vegetarian. The filling was made with cabbage and onions sauteed in butter, then cheese and chopped walnuts were folded in. I kept on nagging my colleague to bring more pies. Occasionally she did, some including cheese and potato, and the newspaper staff would keep an eye on her to make sure we didn't get left behind when she and the pies went for lunch.

When I left Russia, Elena's mother, Lyudmilla, gave me several pies to take on the road. I stuffed my bag full of them and arrived at JFK in a food coma.

Fast forward a year, I finally got my hands on the recipe, and forced Elena to show me how to make them. For me, everything about it was exotic and surprising - I bake a lot and make pizzas, quiche, chicken pot pies, pastries and bread, but it wasn't like anything in my repertoire. For one, the dough was exceedingly soft, sticky and wet. For another, there was no rolling out of dough.


I've tried making them on my own - the one with meat (фыдджин - fyddzhin) didn't turn out very well (I didn't know what to do with the filling) but I did make a pretty decent cabbage one. Called кабускаджин (kabuskadzhin) it is my all time favorite. I also tried цахараджин (tsakharadzhin) which is with the stems of beets and cheese. It's leaner than the cabbage one because the stems are not cooked in butter (they go in the pie raw) and there are no nuts. My pie turned out pretty pink. Elena and I made картофджин (kartofdzhin) together; it's with mashed potatoes with cheese. There are other kinds, with mushrooms, with beans, with pumpkin... most of them seem to be savory.

my first one with cabbage - kabuskadzhin
Now, I have a favor to ask - if you are reading this, and are Ossetian, or know how to make Ossetian pies, or have found good recipes on the internet, please leave a comment with links or recipes in the comment section below. I will try making Ossetian pies over the next few months, and if I succeed, I will upload recipes and photos. I want to be master of Ossetian pies and make them for parties and friends, because I think they are one of the most delicious things I have ever eaten!

my first tsakharadzhin - with beet stems
These pies are just amazing, and while I must say that they are not entirely healthy (they usually contain lots of cheese and some fillings are full of butter) but they are absolutely delicious. In Ossetia, they are made on festive occasions such as birthdays. Recipes are handed from mother to daughter, and an ideal pie is flat and thin, with no holes (see mine full of holes?) and the dough should be evenly thin, moist and soft.

Thank you again, Lyudmilla, for all the pies you gave me, and inspired me with. And much thanks to my lovely friend Elena, who patiently spent hours showing me how it is done!


And for those of you who have never seen such pies before and don't know exactly where Ossetia is on the map: (correct me if I am wrong)

Ossetia is a region in the Kavkaz (Caucasus) mountains, and while Ossetians don't have their own (internationally recognized) country, they do have their own language, Ossetic, which is part of the eastern Iranian branch of the Indo-European languages family. The southern part, South Ossetia, is within Georgian territory, but there have been tiffs there and it is still a region very much disputed over. The northern part is called the republic of North Osetia-Alania and is a republic within the Russian Federation. One of the most famous Ossetian people is Valery Gergiev, renowned conductor, who was born in Moscow but raised in Vladikavkaz. I've never been there (I actually have traveled very little in Russia or the ex Soviet states) but it looks like a place I would like - mountainous and green.


Read More

Tofu noodle salad

This is my take on one of my favourite Chinese appetizers, a salad made with what I believe is dried tofu noodles. (Correct me if I'm laboring under false impressions.) I love it for the texture it has; a little chewy and rough in a good way. I've never been able to locate the exact source of the noodles, even in Chinese grocery stores (I really should ask the waitress) but I've tried it using "tofu noodles" found commonly in the states. 

Original tofu noodle salad, taken in Japan
These noodles are much softer and much less textured than the ones used in the salad (picture left) but I still like it. They're made by House and advertised as being low carb, gluten free and only 20 kcal per package. The gluten-free doesn't impress me (because tofu is not supposed to contain any wheat anyway) but 20 kcal per serving sounds like a good idea. I don't know why they call them "Tofu Shirataki" though - shirataki looks similar, but is a whole different product, made with konnyaku (konjac in English?) and has a different taste and texture. But I digress.


What you need: (per person)

1 package of Tofu "shirataki" noodles - I use the thinnest kind for this salad, but you're free to try the flat kind!
leek - about an inch and a half of the white part
1 teaspoon Chinese chicken bouillon powder
2 teaspoons sesame seed oil
dash of black pepper

(optional: 1 teaspoon rice vinegar, some lettuce, some other vegetables such as cucumber or peppers)

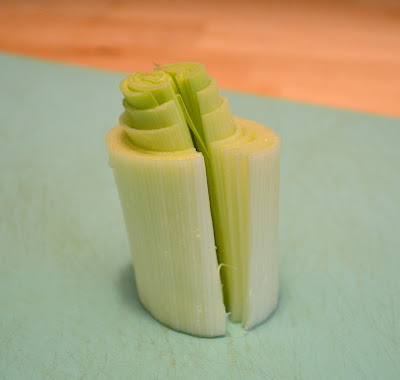
Split your leek down the middle. And yes, I have been practicing horticulture on a small scale inside my fridge. 

Lay both side down flat, and make the thinnest slivers you can with a sharp knife. 

The thinner the better - mine aren't really ideal... I'm sure you could do better!

In a bowl, mix the leek, sesame seed oil, Chinese chicken bouillon powder and dash of black pepper. Combine well and let it sit while you get the noodles. 

Yes, I realize that chicken bouillon powder has MSG in it. But no, I would not replace it with anything else in this dish. My take on MSG is this - sure, it's not natural, but it's not necessarily evil. A bit of it (chicken bouillon powder) now and then goes a long way and it's indispensable in some Chinese dishes, those that don't involve soy sauce or oyster sauce. 

Open the package of noodles into a fine-meshed sieve and and rinse under cold water for a minute. Drain really well - leave the sieve over a bowl for a few minutes if you aren't too hungry. 

Toss with the leek mixture and serve. You can garnish it with a few lettuce leaves, or even add some other vegetables, such as cucumbers or red or green peppers - just cut them as thinly as possible, like the leeks. You can also add a small splash of vinegar, if you like sour food. I do!

If I'm not too hungry, this salad alone is enough for lunch. Otherwise, I'd serve it with any Asian food - Chinese or Japanese, usually. Itadakimasu!

Read More

Rice with burdock (gobo)

So here's my first post, with photos taken with my new camera. After looking at these, my old iPhone photos are... a pain in the eye.

I was wandering around downtown yesterday looking for presents and things for my Halloween costume. Since there's a very nice Japanese food store in Soho, I stopped by to get gobo, (burdock root) one of my favourite Japanese ingredients. Here's a simple rice dish I love - simple and healthy.

You will need:
"3 cups" of short grained white rice (in this case, 1 "cup" is 180cc, or about 3/4 normal cup. So you need a total of 2 and 1/4 cups)
3 tablespoons soy sauce
half a stick (about 15 to 18 inches) of burdock root (gobo)
(1/4 cup sake if you have it)

You will also need a rice cooker.

Serves 4

Peel the skin of the burdock with a vegetable peeler. Using a sharp knife, make 4 or 5 incisions lengthwise in the burdock. Don't cut all the way through (although it's not a disaster if you do - I just find it easier to manage if the sticks are still connected at some point.)

Using the peeler again, shave it into slivers about a couple of inches long. As you go up, make more incisions - just to shave it into slivers instead of wide thin slices. using a sharp knife, thinly slice whatever the peeler can't shave. 

Plunge into cold water and leave for 5 minutes. Burdock root oxidizes very quickly. Soaking it in water will help it release some of that brown color and a slight bitter taste. 

In the meanwhile, wash your rice at least 10 times or until the water runs clear. Just massage it through your hands. By the way, if you have any glass jars or tupperware that smells of tomato sauce or garlic or whatever used to be in it, soak it in the water from washing the rice over night and the smell will disappear completely. Very handy. 

Put the rice in the pot of the rice cooker, drain the burdock and put it over the rice. Add the soy sauce and a little sake if you have some. (I didn't.) Fill the pot with water up to the "3" mark. Cook. 

When it has finished cooking, unplug the rice cooker. Open, and quickly mix the rice and the burdock, being careful not to squash or mash the rice. Close the lid and let stand for 5 to 10 more minutes. Serve.

I had this for lunch with a bit of grilled salted salmon. Miso soup would have been a great addition, too!

Read More

Finnish flatbread with oatmeal

What have I been up to? Taking pictures. With my new, first, "real" camera - a Nikon. 

I know my iPhone pics, heavily filtered and edited with Hipstamatic and Camera+, were far from ideal. But guess what? Having a DSLR hasn't solved all my problems - in addition to learning about aperture and shutter speed, I realized that the subject also has to look damn good because flaws show up so much better on a DSLR! I have to say this for Hipstamatic - although it looks really crummy on anything but an iPhone, it glosses over many defects, or to be more precise, it's so distorted you can't see defects clearly. 

So I'm still fiddling with my camera and food and trying to figure out a way to make everything work. It's going to take some time. In the meanwhile, I've given up and am posting a few things I took pre-DSLR. 

This is something my Finnish friend Elina taught me to bake - I detest porridge, especially oatmeal, but ever since I learnt how to make this, I've been stocking up on oatmeal because I use it up so quickly! There are many ways to make Finnish flatbread, Elina explained, using whatever ingredients you have on hand. There's no hard fast recipe, and I decided that I like mine with lots of oatmeal and just a bit of flour, soft on the inside and crunchy on the outside. 

So here it is.
Elina's flatbread

2 cups oatmeal
1 1/2 cups water
1/2 teaspoon salt
1 teaspoon honey, molasses or maple syrup
1/2 to 3/4 cup flour plus more for dusting (you can use all purpose, what, probably rye as well, whatever you like or have)

Preheat your oven to 400F.

First, cook your oatmeal. Don't buy the "quick" kind - even the normal, "old-fashioned" kind takes just 5 minutes. Just put the water and oatmeal in a pot and stir over medium heat until gloopy and very thick, or about 5 minutes. Add salt, then some sweetener. Stir well.

Add the flour and mix with a wooden spoon. It will still be very very wet and sticky. Line a baking sheet with parchment paper, and drop 1/4 or 1/3 cup spoonfuls of the mixture, leaving plenty of space in between. Sprinkle the tops generously with flour, and constantly dusting your fingers with flour, press the dough down so that it is about a quarter of an inch thick. Poke holes with a fork, and bake in the middle of the oven at 400F for 15 minutes, or until done. The breads probably will not be browned on the top, but the bottoms may start to brown. When you pick one up by the edge, it should not bend, but come up as a whole slab.

Recipe makes about 12 to 15 flatbreads - I usually make a whole bunch, keep them in an airtight container in the fridge and pop one or two in the toaster whenever I want a bite. Makes a great breakfast!

You can put a variety of things on this, but the best is salted butter. I usually salt my butter myself, and whip it a little. Finnish flatbread with oatmeal with plenty of salted butter drizzled on it and a cup of strong coffee - my perfect breakfast these days.

Enjoy!


Read More

Baby bok choy salad

Baby bok choy is common in Japan (but only the young leaves; we never see the sturdier ones in Japan) but they're usually eaten cooked. A nice green vegetable that I never paid much attention to - until I tried it raw in a salad at a dinner with friends - and since then, it's basically been my go-to salad green. 

Actually, a lot of greens eaten raw in many countries are cooked in Japan. Raw spinach is not so common there, and my parents were quite shocked when they heard that in Russia we eat napa cabbage raw. I think I still prefer napa cabbage cooked (especially the thick stems) but bok choy I now prefer raw. 

3 baby bok choy - choose tender ones, not the ones on the verge of turning into tough monsters
3 teaspoons sesame seed oil
2 teaspoons soy sauce
1 teaspoon sugar (any kind)
1 teaspoon white vinegar (you can use any kind, as long as it's white. No Balsamic. God forbid.)
2 teaspoons sesame seeds 

First, cut them the bok choy half, starting from the stem. 

Again cutting from the stem, cut them into wedges, This should make it easier to cut into wedges without everything falling apart. If they do, it's no big deal - I cut them into wedges chiefly for the looks of it. 

You can't say this isn't pretty. 

In a small bowl, combine the dressing ingredients. If your sesame seeds aren't toasted, you can do that by putting them in a small frying pan and tossing them over high heat for half a minute or until you start to smell them. (Do not let them turn brown.)

Toss the bok choy with the dressing in a large bowl, and serve immediately. Do not toss the salad ahead of time - it will make the lovely green wilt and they will not taste as luscious. 

Serves two. 

You can also make loads of this dressing and keep it in the fridge in a jar. I also use it on normal salad, tomatoes, whatever I have lying around. 

You can also use a mix of white and black sesame seeds, or black. 

Read More

Artichoke risotto

Ever since I had my first steamed artichoke with vinaigrette (I'm not talking about the canned stuff found in salad bars here!) I've been mildly obsessed with them. Artichokes aren't to be had in Moscow, but here in New York, they're plentiful, fresh and sometimes inexpensive.

After about three weeks of steaming artichokes, I finally ventured into new territory: artichoke risotto. I've never tried any, and I'm not sure I ever noticed one on a restaurant menu, but I was sure artichokes would be a great addition to risotto, and I combined its rich, slightly quirky flavor with a sharp old Pecorino cheese. Result? Lovely.

Here's what I use:
per person:

1 large artichoke
1/2 medium onion
1 clove garlic
1/2 cup rice (arborio, or sushi rice - short grain white rice, unwashed)
2 tablespoons olive oil
1/2 cube vegetable (or mushroom) bouillon
1 cup dry white wine
1/4 cup grated Pecorino cheese (plus more for garnish)
sprinkle of salt and freshly grated black pepper
1 lemon

Caution - artichokes are prickly.

Lop off the top; about an inch and a half. Lop off the stem if it's very long; you can leave about an inch on.

Prepare a bowl of water with half a lemon squeezed into it. Artichokes oxidizes rapidly; you will dip it in the lemon water as you work, and keep them submerged until they are ready to cook.
Next, pull back and break off some of the outer leaves - actually petals - about 20 or 30 of them.

Using a vegetable peeler (you can use a knife, but I find it easier with a peeler) peel/scrape away most of the tough outer parts.

You want to take away most of the fibrous green material, and leave just the white parts close to the stem.

This artichoke still needs more work.

Cut that in half - isn't that beautiful?

Dip both halves in the lemon water and leave one of them there, while you scoop out the hairy feathery middle with a (sturdy) teaspoon. You will want all of that pretty purply stuff gone. And be careful, they look pretty but they're very prickly.

Here are the cleaned artichoke halves. You will have far, far more garbage than edible parts. But that's just how artichokes are. Love them or hate them.

Lay the halves face down, and slice into wedges about a quarter of an inch thick.

Submerge in the lemon water again until ready to use.

Finely chop the garlic, dice your onion, and saute in olive oil over medium high heat.

Add the rice and continue stirring, until the rice turns slightly translucent.

Add the artichokes, and turn up the heat as high as it will go and continue tossing and stirring to avoid burning.

When everything is really really hot...

... pour in the wine, all at once. Stir quickly.

If you're feeling very fancy, you can use dry white champagne.

When the wine has almost completely evaporated, add half a cup of water, and crumble in the cube of bouillon. 

Continue stirring and cooking over high heat, adding half cups of water as it evaporated. 

Cook for 15 or 20 minutes, until the rice is still  firm, but not crunchy any more. You want it al dente, not porridge-like. 

Turn off the heat, and sprinkle in the Pecorino cheese and give it a quick stir. Season with salt and pepper to taste. 

You can also add a sprinkle of lemon juice here if you like tart food - I do!

Sprinkle a little more Pecorino on top and serve immediately. It makes a good filling dinner even if it is vegetarian, and goes well with salad of any kind. Just be careful with wine, though, because artichokes have a chemical that change taste perception in your mouth and your wine won't taste the same. 

Enjoy!


Read More

Crunchy banana cake

I love the smell of bananas in baked goods, but there is one major drawback - banana breads and cakes tend to be stodgy. However, when I saw this recipe for "crackly banana bread" I was off to the neighboring shop immediately, looking for millet.

Alas, what I thought was millet was, on closer inspection, the ever popular and ubiquitous quinoa, but the next day I walked a few blocks more to an organic store and found millet. It's kind of like bird seed. Actually, it probably is bird seed. But the important thing is that it has a crunchy texture, and you know if there's one texture I can't resist, it's itsy bitsy bits of crunchiness in my food - figs, raspberries, sesame seeds, you name it, I love it.

I added flax seeds as well, thinking it would add to the crackle factor - and it did. I think most of my cakes are going to contain both millet and flax seeds from now on.

Here's what you need, adapted from the original recipe.

3 very ripe bananas (not pictured, because they were pretty gross looking)
1 large egg
1/3 cup virgin olive oil
2/3 cup light brown sugar
1/4 cup ricotta cheese
1 teaspoon vanilla extract
1 teaspoon baking soda
1/4 teaspoon table salt
2 teaspoons spice mix (mix cinnamon, cloves, ginger, nutmeg etc.) (I used spice mix for Chai Masala; it contained some pepper in addition to the aforementioned spices and actually, the spiciness was quite welcome.)
1/8 teaspoon salt
1 1/2 cups white all purpose flour (or whole wheat flour)
1/3 cup uncooked millet
2 tablespoons flax seeds

Preheat your oven to 350F

In a large bowl, mash bananas with a fork or a potato masher until slimy smooth. Whisk in the egg, oil, ricotta and brown sugar. Beat until smooth. Add the vanilla extract.

Add the millet and most of the flax seeds (keep a little for sprinkling on top), salt, baking powder and spice mixture. Mix briefly.


Sift in the flour, and stir until just combined - do not overdo it.

Spray your pan with baking spray (I used a 4 inch by 12 inch loaf pan) and pour in the batter.  


Sprinkle with the remaining flax seeds, and bake in the middle of the oven until a long toothpick or knife inserted in the center comes out clean. It should take about 45 to 55 minutes, depending on your oven.


Take the loaf out and let cool on a rack.


The result is a moist but delectably crunchy cake. The most delicious parts of the cake were, for me, the bottom, the sides, and especially the flax seed-sprinkled top. I think this means that next time I might make this as a sheet cake, perhaps half an inch high. That will mean more room for sprinkling flax seeds. Or maybe I'll use a mould for whoopie pies. 

I have millet on the brain now. I'm thinking what else I can put it in. Carrot cake? Spice cake? Cookies? Yes, yes, yes. I didn't know we fed birds such wonderful stuff!


Read More
 

©2009Figs in the Sun | by TNB